MindView lets you perform various operations on the root of your map or any of its branches, such as changing their shape, choosing a different fill color, defining a branch boundary, or selecting different text attributes. All these formatting options help you add visual interest to your map.
![]() Select the root or branch you want to format.
Select the root or branch you want to format.
![]() To apply the same formatting attributes to all the branches, it is much easier to use the Design tab, whose predefined styles and design options apply to the entire map. See "Designing a mind map" for more information.
To apply the same formatting attributes to all the branches, it is much easier to use the Design tab, whose predefined styles and design options apply to the entire map. See "Designing a mind map" for more information.
You can however select several branches to give them the same formatting attributes. See "Selecting several branches" below for more information.
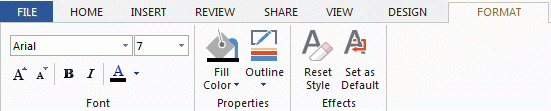
![]() Click the Format tab that appears at the right of the ribbon.
Click the Format tab that appears at the right of the ribbon.
This tab contains formatting options applicable to the selected root or branch.

If you right-click the branch, a floating toolbar with the most commonly used formatting tools will appear above the right-click menu. You can use the commands on the toolbar to format your branch without having to search for the right command in the ribbon.

![]() Browse through the options available in the Format tab or the floating toolbar, checking their effect on your branches as you go.
Browse through the options available in the Format tab or the floating toolbar, checking their effect on your branches as you go.
![]() A quick way of copying the formatting attributes from one branch to another is to use the Format Painter
A quick way of copying the formatting attributes from one branch to another is to use the Format Painter ![]() . Select the branch whose formatting you want to copy and choose Home | Clipboard | Format Painter or press Ctrl + Shift + C. The cursor changes to a paintbrush icon
. Select the branch whose formatting you want to copy and choose Home | Clipboard | Format Painter or press Ctrl + Shift + C. The cursor changes to a paintbrush icon ![]() . Click the branch you want to copy the formatting to. Pressing Ctrl while clicking the branch will let you continue copying the format to other branches by clicking each one in turn. To return the icon to its normal shape after the copying, click the Format Painter icon again.
. Click the branch you want to copy the formatting to. Pressing Ctrl while clicking the branch will let you continue copying the format to other branches by clicking each one in turn. To return the icon to its normal shape after the copying, click the Format Painter icon again.
If necessary, you can undo your changes and return the branch to the original map style defined in the Design tab by choosing Effects | Reset Style.
![]() To return all the branches to the initial style, select them all (Ctrl + A), and choose Effects | Reset Style in the Format tab.
To return all the branches to the initial style, select them all (Ctrl + A), and choose Effects | Reset Style in the Format tab.
![]() To return the entire map to the initial style (i.e. not only the branches, but also the global map properties such as page color or page pattern), choose Effects | Reset Style in the Design tab.
To return the entire map to the initial style (i.e. not only the branches, but also the global map properties such as page color or page pattern), choose Effects | Reset Style in the Design tab.
Selecting several branches at once allows you to apply the same change to all of them simultaneously.
![]() Click the first branch, then press and hold down the Ctrl key while clicking the other branches one by one.
Click the first branch, then press and hold down the Ctrl key while clicking the other branches one by one.
Each of the branches you click becomes highlighted to indicate that it is selected.
![]() To deselect one or more branches simply click them again while holding down the Ctrl key.
To deselect one or more branches simply click them again while holding down the Ctrl key.
You can also select several branches by drawing a frame around them with the mouse. All the branches contained within the frame become selected.


![]() Press Ctrl + A to select all branches.
Press Ctrl + A to select all branches.
![]() When you select several branches in this way, the header of the Format tab changes to Multiple Branches, indicating that any changes you make will apply to all the selected branches. If the branches you selected belong to different levels (for instance, some main branches as well as some sub-branches), only the options that the different levels have in common are shown in the Format tab.
When you select several branches in this way, the header of the Format tab changes to Multiple Branches, indicating that any changes you make will apply to all the selected branches. If the branches you selected belong to different levels (for instance, some main branches as well as some sub-branches), only the options that the different levels have in common are shown in the Format tab.
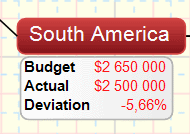
If you have added information on your branches such as task data or calculation values, you can display this data directly on the branches:
![]() Choose View | Data | Show Branch Data
Choose View | Data | Show Branch Data ![]() (or right-click the workspace and choose Show Branch Data) and check the fields you want to see in the sub-menu.
(or right-click the workspace and choose Show Branch Data) and check the fields you want to see in the sub-menu.
![]() You can hide or show the fields on individual branches with the Show Branch Data icon of the Format tab (or the Show Branch Data option in the branch local menu).
You can hide or show the fields on individual branches with the Show Branch Data icon of the Format tab (or the Show Branch Data option in the branch local menu).
If you have chosen to display resource cost information on the branches (such as Cost, Actual Cost or Remaining Cost), you can define the currency symbol and the number of decimal digits to be used for the entire document. See "Currency" in the topic "Setting up your preferences".
You can also specify how this data should be represented.
![]() Select the branch whose data you want to format by clicking it.
Select the branch whose data you want to format by clicking it.
![]() Click the block of branch data displayed below the branch.
Click the block of branch data displayed below the branch.
![]() Click the Format tab that appears at the right of the ribbon.
Click the Format tab that appears at the right of the ribbon.
This tab contains formatting options applicable to the branch data of the selected branch.
![]() Browse through the options available in the different panels, checking their effect on the branch data as you go.
Browse through the options available in the different panels, checking their effect on the branch data as you go.
You can also give specific text attributes to the different elements of the branch data. To do this, click the particular element within the block of branch data, and choose the required attributes in the Format tab.
![]() Once you have formatted the branch data to your liking, you can easily apply that formatting to the data of all the other branches by clicking the Set as Default icon.
Once you have formatted the branch data to your liking, you can easily apply that formatting to the data of all the other branches by clicking the Set as Default icon.
As well as the Format tab, you can also use the Properties dialog to make changes to the selected root or branch. The Properties dialog always lists all the properties applicable to the element currently selected in the workspace.
![]() Select the root or branch you want to format, or the block of branch data you want to format.
Select the root or branch you want to format, or the block of branch data you want to format.
![]() Choose View | Show/Hide | Panels | Properties to open the Properties dialog.
Choose View | Show/Hide | Panels | Properties to open the Properties dialog.

See "Using the Properties dialog" for a general description of the Properties dialog.
See "Root properties: General tab" and "Branch properties: General tab" in the Reference section for a detailed description of the general properties applicable to a root or branch.
See "Root properties: Text tab" and "Branch properties: Text tab" for a description of the properties applicable to the branch label.
See "Branch data properties: General tab" in the Reference section for a detailed description of the properties applicable to branch data.