![]() MindView allows you to assign resources to your task lists and project plans. Resources are the people and materials needed to complete the tasks to be performed.
MindView allows you to assign resources to your task lists and project plans. Resources are the people and materials needed to complete the tasks to be performed.
MindView lets you define two types of resources:
 Work resources
Work resources are the people who perform the work.
For each work resource, you can define their availability (i.e. how much of their working day they can devote to it), and their rate (i.e. how much they will need to be paid per unit of work).
![]() Work resources also have their own calendar, defining their working and non-working time. By default, resource calendars are identical to the project calendar. For more information, see "Defining resource calendars" below.
Work resources also have their own calendar, defining their working and non-working time. By default, resource calendars are identical to the project calendar. For more information, see "Defining resource calendars" below.
Material resources
Material resources are the consumable items (paper, electricity, nails, sand etc.) that you need to carry out the project.
You can also associate a unit cost to each material resource, so that you can track the overall cost of your project in human as well as in material resources.
![]() If you are working on a simple task list in Task Management mode (i.e. when your document type is set to "Task Management" in the Task/Timeline panel), all resources are assumed to be of type Work, and you cannot define their availability or rate.
If you are working on a simple task list in Task Management mode (i.e. when your document type is set to "Task Management" in the Task/Timeline panel), all resources are assumed to be of type Work, and you cannot define their availability or rate.
![]() Adding resources to tasks when working in Task Management mode has no effect on the task duration. If however you are working in Project Management mode (typically on a Gantt project), adding resources to a task may affect its duration. For more information on this, see "Understanding effort-driven scheduling" below.
Adding resources to tasks when working in Task Management mode has no effect on the task duration. If however you are working in Project Management mode (typically on a Gantt project), adding resources to a task may affect its duration. For more information on this, see "Understanding effort-driven scheduling" below.
All the resources used in your project are listed in the resource list for the entire project, called the global resources list. Although it is usually quicker to start by setting up the global resources list, from which you can then select the resources to assign to the different tasks, you can also create resources as you need them by assigning them to tasks.
You can assign resources to a task as follows:
![]() Select the task.
Select the task.
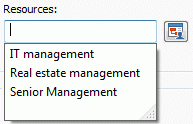
![]() In the Task/Timeline panel, type the resource names in the Resources field, separating them with semi-colons.
In the Task/Timeline panel, type the resource names in the Resources field, separating them with semi-colons.
If the global resources list for the project already contains resources, a drop-down appears so that you can select names from it.
![]() Resources that are not already listed in the global resources list and that you create by entering them in this way are assumed to be of type Work, i.e. human resources. Resources of type Material need to be created in the global resources list, as described in "Setting up a global resources list" below.
Resources that are not already listed in the global resources list and that you create by entering them in this way are assumed to be of type Work, i.e. human resources. Resources of type Material need to be created in the global resources list, as described in "Setting up a global resources list" below.
The resources you have entered above are now assigned to the task, and added to the global resources list if they are not listed there already.
![]() Where possible, it is better to select rather than type resource names. That way you don't run the risk of adding wrongly spelled entries to the global resources list.
Where possible, it is better to select rather than type resource names. That way you don't run the risk of adding wrongly spelled entries to the global resources list.
To de-assign a resource, simply delete it from the field. Note that this removes the resource from the task, but not from the global resources list.
You can also assign resources to a task from its Task Information dialog:
![]() Click the Resources button
Click the Resources button ![]() to the right of the Resources field.
to the right of the Resources field.

![]() Click an empty row in the Resources dialog and enter the resource by typing it or by selecting it from the drop-down list.
Click an empty row in the Resources dialog and enter the resource by typing it or by selecting it from the drop-down list.
![]() (optional) If you also intend to use MindView for task distribution and task tracking, enter an email address for the resource. To know more about these features, refer to "Exporting to Microsoft Outlook task list" and "Managing and tracking tasks". This only applies to resources of type Work (i.e. human resources).
(optional) If you also intend to use MindView for task distribution and task tracking, enter an email address for the resource. To know more about these features, refer to "Exporting to Microsoft Outlook task list" and "Managing and tracking tasks". This only applies to resources of type Work (i.e. human resources).
![]() Once entered, email addresses can only be edited by clicking Project Resources at the bottom of the dialog to access the global resources list.
Once entered, email addresses can only be edited by clicking Project Resources at the bottom of the dialog to access the global resources list.
![]() (optional) The Units field indicates how much of the resource's available time is being used to work on the task. By default, resources are assumed to be able to devote 100% of their working time on the task. If the resource is only available part of the time, for instance because they also have other duties, specify here the percentage of their working time that they can spend on the task. You can also enter a higher value, for instance 300% if your resource is a "virtual" resource representing a group of three equivalent human resources.
(optional) The Units field indicates how much of the resource's available time is being used to work on the task. By default, resources are assumed to be able to devote 100% of their working time on the task. If the resource is only available part of the time, for instance because they also have other duties, specify here the percentage of their working time that they can spend on the task. You can also enter a higher value, for instance 300% if your resource is a "virtual" resource representing a group of three equivalent human resources.
![]() The Units value is based on the availability of the resource as shown in its resource calendar. By default, all resource calendars are identical to the project calendar. If however you have modified the calendar of the resource to indicate a different work pattern, the units value will be based on that modified resource calendar. For more about resource calendars, see "Defining resource calendars" below.
The Units value is based on the availability of the resource as shown in its resource calendar. By default, all resource calendars are identical to the project calendar. If however you have modified the calendar of the resource to indicate a different work pattern, the units value will be based on that modified resource calendar. For more about resource calendars, see "Defining resource calendars" below.
If the resource is a material resource, enter the number of units that you will need for the task.
The Cost field is a calculated field which shows you the cost of the resource for that task. For human resources (type Work), it is based on the unit percentage specified in Units, the cost per unit of the resource (rate), and the duration of the task. For material resources (type Material), it is based on the number of units and the cost per unit. As the field Cost is a calculated field, it cannot be edited.
Note that the Cost field is not refreshed automatically when you edit the Units field. It is only updated when you close the dialog.
To see how to specify the cost per unit of a resource, refer to "Setting up a global resources list" below.
![]() You can customize the symbol used to represent the cost, its placement and the number of decimal digits used. For more information, see "Setting up your preferences".
You can customize the symbol used to represent the cost, its placement and the number of decimal digits used. For more information, see "Setting up your preferences".
![]() The Units and Cost fields are only available when working in Project Management mode.
The Units and Cost fields are only available when working in Project Management mode.
To de-assign a resource, select it and click Remove. Note that this removes the resource from the task, but not from the global resources list.
If you are working on a project plan in the Gantt view, you can also enter resources in other ways:
Select the task and choose Tasks | Assign Resources ![]() on the Gantt Tools tab.
on the Gantt Tools tab.
Select the task and choose View | Task Information ![]() on the Gantt Tools tab. Click the Resources tab in the Task Information dialog that opens.
on the Gantt Tools tab. Click the Resources tab in the Task Information dialog that opens.
![]() You can also open the Task Information dialog by pressing Shift + F2 or by double-clicking the task bar on the Gantt chart.
You can also open the Task Information dialog by pressing Shift + F2 or by double-clicking the task bar on the Gantt chart.
Click the Resources cell of the task at the far right of the Gantt Outline. Type the resource name(s), separating them with semi-colons.
![]() Once associated to a task, you can view the details of a particular resource simply by double-clicking its name in the Resources field of the Task/Timeline panel.
Once associated to a task, you can view the details of a particular resource simply by double-clicking its name in the Resources field of the Task/Timeline panel.
Although MindView lets you define the resources as you need them as we have just seen, it is usually more efficient to start by setting up a global resources list from which you can then select resources to assign to the various tasks.
The global resources list associated with a task list or project plan is saved whenever you save the file. Each task list or project plan has its own global resources list.
You can access the global list of available resources in different ways:
Click the Project Resources link at the bottom of the Task/Timeline panel.
Open the Task Information dialog of a task, click its Resources tab and click the Project Resources button in its bottom left corner.
If you are working on a project plan in the Gantt view, choose Project | Project Resources on the Gantt Tools tab.
The Project Resources dialog lists all the resources that are currently assigned to tasks, as well as any that you import or type in directly.

![]() To add a new resource to the list, click the first empty field and enter the resource name.
To add a new resource to the list, click the first empty field and enter the resource name.
If you also intend to use MindView for task distribution and task tracking, enter an email address for the resource. To know more about these features, refer to "Exporting to Microsoft Outlook task list" and "Managing and Tracking Tasks". This only applies to resources of type Work (i.e. human resources).
![]() (optional) If you want to be able to track the overall cost of your project, you can specify the cost per unit of the resource in the Rate field. Although the default time unit is h (per hour), you can enter other time units: m (per minute), d (per day), w (per week), mo (per month), y (per year). To specify a rate of $320 per day for instance, you would enter 320/d.
(optional) If you want to be able to track the overall cost of your project, you can specify the cost per unit of the resource in the Rate field. Although the default time unit is h (per hour), you can enter other time units: m (per minute), d (per day), w (per week), mo (per month), y (per year). To specify a rate of $320 per day for instance, you would enter 320/d.

![]() You can customize the symbol used to represent the rate, its placement and the number of decimal digits used. For more information, see "Setting up your preferences".
You can customize the symbol used to represent the rate, its placement and the number of decimal digits used. For more information, see "Setting up your preferences".
![]() (optional) By default, all resources are assumed to be of type Work, i.e. human resources. The column Type lets you change the type of a resource from Work to Material.
(optional) By default, all resources are assumed to be of type Work, i.e. human resources. The column Type lets you change the type of a resource from Work to Material.
The rate of a material resource is its cost per unit.
If you want to indicate a unit of measurement for a material resource (e.g. tons, cubic meters, boxes, etc.) you can do so by clicking the Edit button and entering this information in the Material label field of the dialog box that appears.
![]() The Rate and Type fields are only available when working in Project Management mode.
The Rate and Type fields are only available when working in Project Management mode.
The Project Resources dialog lets you perform other operations:
To delete one or more resources, select them and click Delete.
![]() Use the Shift key to select contiguous resources and the Ctrl key to select non-contiguous resources.
Use the Shift key to select contiguous resources and the Ctrl key to select non-contiguous resources.
To import a previously exported global resources list, click Import and select the required list.
![]() You can also import the resources list of an existing Microsoft Project document by exporting that document to XML from Microsoft Project, then choosing the exported XML document in this dialog.
You can also import the resources list of an existing Microsoft Project document by exporting that document to XML from Microsoft Project, then choosing the exported XML document in this dialog.
To export the global resources list for use in other documents or for sharing with colleagues, click Export, and choose a folder and file name for your exported list.
![]() When exported, the global resources list is saved in the MindView XML format.
When exported, the global resources list is saved in the MindView XML format.
To import one or more resources from your Microsoft Outlook Address Book, click Address Book, select the contact names you want to add as resources in the Outlook dialog, click the Add button and click OK.
To import one or more resources from the Windows Active Directory database, click Active Directory. In the dialog box that opens, click the Advanced button, then the Find Now button. Select the user(s) you want to add as resources in the bottom part of the dialog, and click OK. The Active Directory is a centralized database maintained by Windows to store information relating to an organization's network (such as resources, services and users).
If you are working on an online document hosted on the MatchWare Shared Workspace, clicking Shared Workspace will allow you to select resources from the list of registered users of the workspace. For more information about the MatchWare Shared Workspace, see "Setting up an online workspace".
As soon as you create a new resource, MindView creates a resource calendar for it, defining the working and non-working time of the resource. By default, resource calendars are identical to the project calendar. If all your resources follow the work pattern defined by the project calendar, you do not need to edit any of their calendars. If on the other hand some of your resources only work part-time for instance, you can indicate this in their calendars, so that MindView can take this into account when scheduling tasks to which they have been allocated.
![]() Resource calendars are not taken into consideration by manually scheduled tasks. For more information about manual task scheduling, see "Using scheduling task modes".
Resource calendars are not taken into consideration by manually scheduled tasks. For more information about manual task scheduling, see "Using scheduling task modes".
Any changes you make to the project calendar are automatically transferred to all the resource calendars. However, specific changes you might have made to the working time of a particular resource are preserved.
For more information about how to edit a resource calendar, see "Defining calendars".
![]() Effort-driven scheduling is only relevant for automatically scheduled tasks. For information about manual task scheduling, see "Using scheduling task modes".
Effort-driven scheduling is only relevant for automatically scheduled tasks. For information about manual task scheduling, see "Using scheduling task modes".
Before you assign any resources to a task in a Gantt project, the task has no work associated with it. It is the process of assigning resources to a task that define its work value, which is the amount of effort the resource or resources will need to spend on the task to complete it.
For each resource, work is defined according to the scheduling formula : Work = Duration x Units.
The overall work value for the task is the sum of the work performed by each resource.
Therefore if you have just one resource working 100% of their time on the task, the work value for the task will be the same as the duration, as the example below shows.

In general, the work value will differ from the duration only if you assign more than one resource to the task, or if the resource does not work full-time on the task.
The example below shows the effect of adding another resource, Bill, also working 100% of their time, on Task1. As Bill is also going to produce 8 hours of work, the overall work value for the task goes from 8 hours to 16 hours, but the duration is still only 1 day.

You may however want to produce a different result and expect that by adding another full-time resource to the task, the amount of work needed to perform the task should remain constant, and it should therefore be completed in half the time. This scheduling method is known as effort-driven scheduling. By default, MindView does not apply effort-driven scheduling, but you can choose to activate this scheduling method on your tasks. With effort-driven scheduling activated, adding Bill to Task 1 in our 1st example would produce the result below:

You can see that the amount of work has now remained constant at 8 hours, but the duration has decreased to half a day.
![]() To activate effort-driven scheduling for a task, open its Task Information dialog on its General tab and check the Effort-driven option.
To activate effort-driven scheduling for a task, open its Task Information dialog on its General tab and check the Effort-driven option.

![]() Effort-driven scheduling only affects the scheduling of a task when you assign or remove resources from it, and is independent from the scheduling type of the task. For more information about task types, see "Using scheduling task types".
Effort-driven scheduling only affects the scheduling of a task when you assign or remove resources from it, and is independent from the scheduling type of the task. For more information about task types, see "Using scheduling task types".
![]() If you want MindView to apply effort-driven scheduling to all the tasks of the projects you create, you can specify this in the MindView Options. For more information, see "Setting up your preferences". You can also choose to activate effort-driven scheduling only for the new tasks of the open document. To do this, click the File tab, choose Info | Properties and set the New tasks are effort-driven option to Yes.
If you want MindView to apply effort-driven scheduling to all the tasks of the projects you create, you can specify this in the MindView Options. For more information, see "Setting up your preferences". You can also choose to activate effort-driven scheduling only for the new tasks of the open document. To do this, click the File tab, choose Info | Properties and set the New tasks are effort-driven option to Yes.